Ready to kick up a Desert Storm ? With this soft & sultry look and edgy winged liner, get ready to give even the Djinns sleepless nights.
This EOTD was inspired by Lakme' Eye quartet Desert Rose comes to you with a step by step picture tutorial to help you recreate the look.
Read on to find out more ...


Products I used for this look


Step 2. Use and eyeshadow brush (use any you have at hand) and apply the light pink shadow in the center of the lid and sweep it towards the outer corner.Do not apply the shadow in the innermost corner of the eye at this stage.


Step 3.Apply the coppery-bronze shade on the outer corner of your lid and sweep it towards the outer corner of your eye. Do not extend it beyond the eye lids.

At this stage after putting the 2 shades your eye should look more or less like this.

Step 4. Using a crease brush or a tapered blending brush take the darkest rust bronze color and apply it on the crease area. Make sure you tap away excess powder on the brush before applying it to the crease.
 Step 5. Next the dark shade in the crease area needs to be blended in the rest of the shades on the lid. Using tapered blending brush, go over your crease in a windshield-wiper-motion going back and forth on the crease, gently blending away any harsh lines and diffusing the crease color. This is what your eye should look like now.
 Step 6.Use a large eyeshadow brush and pick up the lightest creamy white shade on the brush and apply it at the arch of your brow.This will accentuate your brows.In light sweeps blend in the crease and highlight color. Use a small brush and apply the shimmery creamy white shade on the inner most eye corner near your tear duct areas, this would make your eyes look fresher and wider.
 Step 7. Using a thing pencil brush / flat shadow brush (preferably use a smaller brush for this step)pick up the copper bronze color and apply it on the lower lashline and blend at the outer most corner of the eye and create a V shape on outer corner
 Step 8. Use a large dome shaped blending brush (MAC 217),do not pick any eyeshadow with this brush, the clean brush should be used to blend the crease and highlight color.We are done with eyeshadow application at this stage.

Step 9.For the eyeliner work, rest your elbow on the table top to steady your hands and use an angled eyeliner brush for precise eyeliner work.Pick up black gel eyeliner and draw a very very thin line on upper lash line,going as close to the lashes as possible.

Step 10. Flick this line upward at the outer corner to create a wined shape.
 Step 11. When you have the basic winged liner in place, create a thin scalene triangle with your eyeliner at the outer eye corner to accentuate the winged liner.
 Step 12. Use the same angled eyeliner brush and apply gel liner on the lower lash line and waterline, alternately you can use kohl for your waterline.At the outer corner ensure the lower lash line merges with the winged eyeliner. (This step requires some practice to perfect so keep at it & you'll b a seasoned pro soon)

Step 13. Using an eyelash curler curl up your eyelashes & apply mascara. You'd have notice a lot of eyeshadow fall out on your upper lashes.So apply the first coat of mascara looking down in to the mirror and coat the upper side of your lashes and then apply 2 coasts of mascara in upward sweep.
 At this stage your look is complete and it'd look like so.Dust away any excess eyeshadow fall out on the under eye area using a fan brush / Q tip soaked in makeup remover for any spot correction.
Apply concealer on your under eye area and gently blend it to cover any dark circles under your eye. The concealer is applied after eye makeup, so any fall out can be cleaned off and the concealer ensure radiant skin under the eye. Use a translucent powder to set the concealer under the eye, alternately use you powder compact.
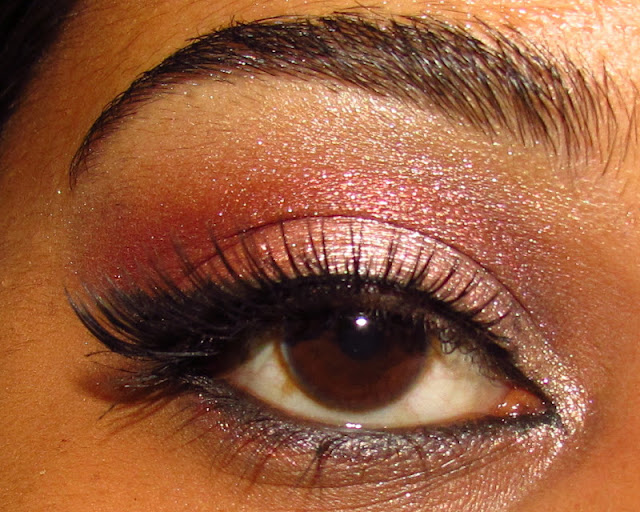
Here's the finished looks sans the falsies
 Step 13. To add more drama and definition to the look, you can add a pair of falsies. This is the final finished look after adding the falsies.

What do you think of the final look?Did you like the tutorial? What can be added/ deleted to make it better and more useful? Comment & Tell, I'm eager to hear your thoughts!
This EOTD was inspired by Lakme' Eye quartet Desert Rose comes to you with a step by step picture tutorial to help you recreate the look.
Read on to find out more ...


Products I used for this look
- Lakme Eye quartet Desert Rose

- Maybelline Eye Studio Gel eyeliner-Black
- NYX HD Eyeshadow base
- Maybelline Hyper Curl Mascara
- Oriflame Eye lash curler
- MAC Select Moisture cover concealer
- KKCenterHK Fake eyelashes
- QVS Eyelash glue
- Coastal scents Large eyeshadow brush,pro blending brush, tapered blending brush & angled eyeliner brush
- QVS flat eyeshadow brush

Step 2. Use and eyeshadow brush (use any you have at hand) and apply the light pink shadow in the center of the lid and sweep it towards the outer corner.Do not apply the shadow in the innermost corner of the eye at this stage.


Step 3.Apply the coppery-bronze shade on the outer corner of your lid and sweep it towards the outer corner of your eye. Do not extend it beyond the eye lids.

At this stage after putting the 2 shades your eye should look more or less like this.

Step 4. Using a crease brush or a tapered blending brush take the darkest rust bronze color and apply it on the crease area. Make sure you tap away excess powder on the brush before applying it to the crease.


Step 9.For the eyeliner work, rest your elbow on the table top to steady your hands and use an angled eyeliner brush for precise eyeliner work.Pick up black gel eyeliner and draw a very very thin line on upper lash line,going as close to the lashes as possible.

Step 10. Flick this line upward at the outer corner to create a wined shape.


Step 13. Using an eyelash curler curl up your eyelashes & apply mascara. You'd have notice a lot of eyeshadow fall out on your upper lashes.So apply the first coat of mascara looking down in to the mirror and coat the upper side of your lashes and then apply 2 coasts of mascara in upward sweep.

Apply concealer on your under eye area and gently blend it to cover any dark circles under your eye. The concealer is applied after eye makeup, so any fall out can be cleaned off and the concealer ensure radiant skin under the eye. Use a translucent powder to set the concealer under the eye, alternately use you powder compact.
Here's the finished looks sans the falsies


What do you think of the final look?Did you like the tutorial? What can be added/ deleted to make it better and more useful? Comment & Tell, I'm eager to hear your thoughts!
Love your winged eye liner look..so gorgeous! I am def gonna try this! thanks for the step by steps..waiting for more such tutorials!
ReplyDeleteHey Parita, so happy you like the look & tutorial, I'll try & do some more tutorials soon :D
Deletewow this looks beautiful!!! :) loved the step by step tutorial...
ReplyDeleteThanks glad you liked it, more tutes coming up!
DeleteHey! This is my everyday quad and the look sans the lashes! Isn't it so great to wear everywhere?
ReplyDeleteYay its a very nice wearable palette, actually I have barely used it, but I finally decided to put it to use, I love the rich broze and coppery shades in it!
DeleteI have this quad and I love all its shades, nice look!
ReplyDelete:D !!!
ReplyDelete